Painting a popcorn ceiling, often known as an acoustic or cottage cheese ceiling, can appear to be quite a daunting task. The surface appears to be warped and tends to fracture or flake, which makes painting on it somewhat difficult. Fortunately, it’s entirely possible to achieve a smooth ceiling that appears freshly painted with the right techniques and tools. This guide will walk you through the essential steps, starting from the very beginning, perfect for those who are new to home improvement.
Why Paint a Popcorn Ceiling?
Before proceeding to paint a popcorn ceiling, consider whether you have good enough reason to do so. Regardless of whether you want to change the appearance of your room, hide some stains, or pursue more fashionable trends, the painting of a popcorn ceiling will be useful to refresh the appearance of the room. Nevertheless, popcorn ceilings are prevalent in many contemporary houses, and the tendency is towards making it more of a sleek ceiling.

Tools and Materials That May be Required When Painting
The following are materials and tools that you should gather to make your painting job successful:
1. Paint
2. Paint Roller
3. Paint Tray
4. Drop Cloths
5. Painter’s Tape
6. PPE
7. Spray Bottle
8. Putty Knife
9. Vacuum with a Brush Attachment
Step-by-Step Guide
Step 1: Prepare Your Room
Tarp the Space: Cover the furniture and the floor with plastic sheets or a drop cloth. Cover the points where the splattering of paint could occur by nailing the edges of the drop cloths on the wall.
Separate the Walls from the Ceiling: Apply painter’s tape from the top corners towards the wall so that they cover the ceiling line. This will make it easier for you to produce straight strokes and also avoid any paint stains on the walls.
Ventilation: When using latex paints or any paint, ensure that you open the windows and use a fan to allow air circulation.
Step 2: Inspect and Repair
Look for Defects: Inspect the ceiling surface for existing cracks or holes or areas which appear to be loose. Fill these regions with spackle, or a joint compound, and let it dry to a powder.
Remove Layers of Damaged Texture: The use of a trowel or drywall knife can help peel off damaged texture. Do not exert excessive pressure which may end up damaging the ceiling.
Step 3: Smooth the Texture (Optional)
Mist the Ceiling: Fill a spray bottle with a mixture of water and a few drops of dish soap. Lightly wet the ceiling with water; particularly wet the areas that you intend to paint. Avoid soaking the ceiling.
Apply Texture: Even out the texture throughout by rubbing it with a sponge or trowel. Wait until the ceiling has dried, both on the inside surface and on the outside. This step is optional but it can make it easier in the latter steps to achieve a more polished look.
Step 4: Prime the Ceiling (If Necessary)
If the texture is noticeably smooth and/or if you are going to paint over dark color, then it is better to apply one coat of sealer. The best way to apply the primer is using the roller suitable for textured surfaces. Follow the manufacturer’s instructions on how to let it dry.
Step 5: Paint the Ceiling
Roller Coating: Pour your ceiling paint in the tray and make sure you have applied an even amount to the roller. Paint from the corner of a room up to the middle of the ceiling using the rolling technique in the form of W or M. This method helps in the painting to spread and cover its surface uniformly and also to avoid roller marks.
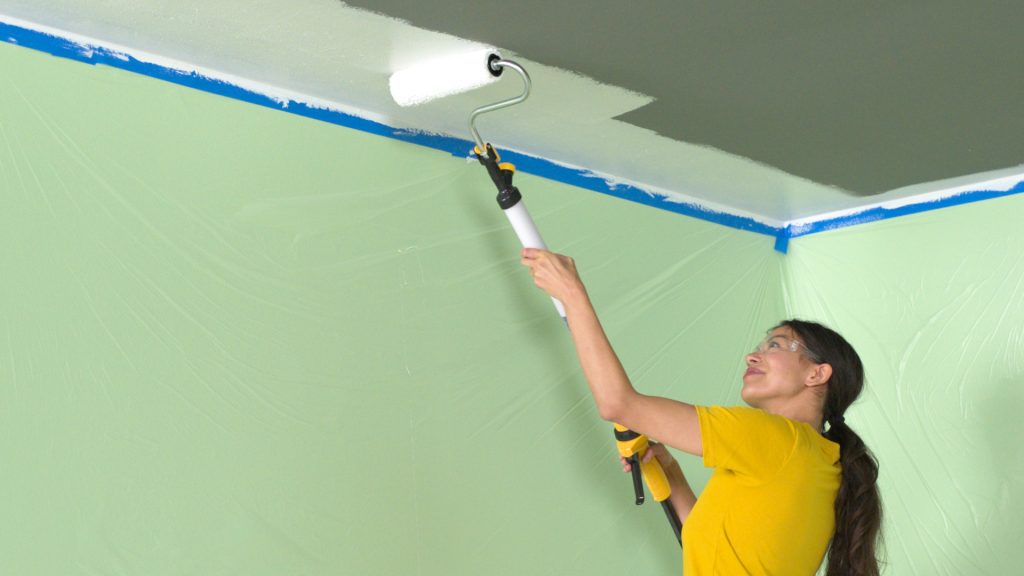
Overlap as You Go: Make slight overlaps of the section you are working on.
Texture Condition: Apply paint into the crevices of the texture or else it will look patchy.
Work in Sections: For ceiling painting, one must work in sections to avoid formation of stripes on the ceiling surface.
Step 6: Apply a Second Coat
First Coat: Upon drying of the first coat consider whether you need to apply another coat. In basic application, a second coat may offer a more even finish and better coverage.
Second Coat Application: This should be applied in the same manner as the first to achieve an equal coat spread on the walls.
Step 7: Clean Up and Final Touches
Remove Tape: To avoid damaging the paint when removing, it is wise to do it while the paint is still wet.
Clean Up: After that, use a vacuum, having a brush attached to it in order to clear any dust and other particles. Wash the tools according to the manufacturer’s instructions.
Check Your Work: Any accidental areas or zones left unburnished or underdone need to be fixed in this stage.
