The fact that you may find a paint bubble on your walls would probably just spoil the enjoyment of painting. They can be the reason that a room painted recently will disappoint you. In order to avoid and repair paint bubbles, you have to know their reasons for existence and take the necessary measures to prevent them. If you use the right methods and the proper tools, the outcome of your work will be a work of art that will last.
Understanding the Causes of Paint Bubbles
If you want to prevent and rectify the case of paint bubbles, you should find the root of the problem. Prolonged moisture is the most common reason for paint damage. The wall might not have been properly prepared before painting, or the room’s current condition might be too humid. Non-adherence to the surface due to any dirt or oil makes bubbles to paint. When working with low-quality or thick paint, paint bubbles might appear.
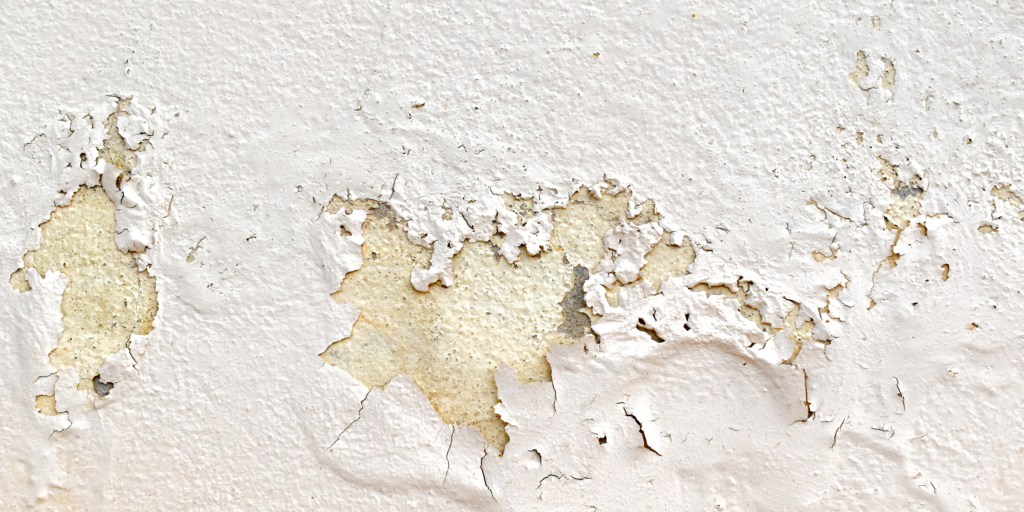
Take a close look at the paint bubbles and try to find out the source of the problem. Small, scattered bubbles are an indication of moisture or a dusty surface. Nevertheless, excess paint may lead to superbly large, thickly concentrated bubbles. To avoid paint bubbles, you need to understand what those causes are.
Preparing Your Wall for Painting
To prevent paint blots, prepare your wall first before painting. Remove the dust, dirt, and grease from the surface by cleaning it well. Dilute a mild detergent in warm water and wash the walls, rinsing well afterward. A filler/spackling compound is used to fill cracks and gaps in walls after cleaning. Smooth out the sanded areas by sanding and dusting the dust particles with a moist cloth.
Before painting, priming walls is mandatory, followed by repairing and sanding. The primer not only smoothens the surface but also assures the paint adherence. Roll it or brush it to create an even cover of the primer on the wall. Let the primer dry completely so that it can be applied properly. Correct wall preparation is the best way to eliminate the paint bubbles and give the paint a solid ground to adhere to.
Choosing the Right Paint and Tools
Selecting the right type of paint and tools will avoid paint bubbles and will give the final look of a professional job. Pick up a premium-quality paint that is produced for the type of surface you are painting. Read the label first to understand the different surfaces and paints. Additionally, consider paint shine. Kitchens and bathrooms both very much benefited from the moisture resistance and cleanliness offered by glossy surfaces.
Applying Paint Correctly
A smooth and bubbles-free finish is achieved by the right manner of application. Apply trim or ceiling along the border of the wall by brushing in between. Such will make the wall-filling process with the roller-filling technique easier. To make sure bubbles are not present, roll evenly and use long, smooth strokes.
Do not soak your brush or roller with the paint. Dripping paint and irregularities in application lead to the formation of paint bubbles. Forget about applying thick layers; do thin and even layers instead and leave each one to dry before applying the next. Implement these guidelines, and do not hurry, and you will get a perfect result with no paint bubbles.
Dealing with Humidity and Moisture
Humidity and moisture are detrimental to the paintwork and may cause it to bubble. Paint bubbles and peels can happen if there is too much moisture in the room. Open the windows or use the fans to create ventilation in the room so you do not experience this. Using a dehumidifier is the best way to remove moisture from the air when painting in high humidity.
You should first deal with water spots and flaking paint before painting. First, find the source of moisture, for instance, a leaky pipe or ventilation problem, and deal with it before painting. The way to keep bubbles off your well-painted surfaces for years is to fix moisture and humidity issues.
Fixing Paint Bubbles
Even after all your efforts, paint bubbles will sometimes pop up on walls. Immediate response to these problems is needed to prevent a further negative impact. Utilize a putty knife or scraper to take off the flaking and bubbled paint. Avoid damaging the surface. First, scrape off any loose paint, followed by subsequent sanding to make the surface even.
To remove the dust after sanding, you can use a moist towel; the area should be allowed to dry. When dry, use a quick brush or roller to apply the thin coating on the affected area. Then, wait until the primer dries apart, put a thin coat of paint on it, and try to feather the edges to blend. Follow these methods to remedy the paint bubbles and get rid of the wall faults.
It is essential to avoid paint bubbles, and the solution to this problem is fixing it. Before repainting, fix leaks and ventilation if moisture is the cause of bubbles. Sample Sentence: In conclusion, one of the most important lessons I have learned during my college years is the value of time management. Before going to the process of painting, prime and prepare the surface. By taking these precautions, you will be able to avoid the paint bubbles and get a presentable finish.
Maintaining Your Painted Walls
Once you have applied your walls and settled any bubbles, maintaining them will help you prolong their lives. Washing the walls weekly or bi-weekly with mild detergent and warm water will keep them clean and remove any dirt or stains that may have formed. Choose mild detergents and avoid aggressive chemicals that may harm the paint surface.
In a nutshell, an effective way of preventing and correcting paint bubbles is very important in achieving a perfect finish and wall look. No one likes the sounds of annoyance and the sight of ugly defects. Therefore, understanding the sources of paint bubbles and preventing them from occurring is the key. Ready your surface, select the correct paint and tools, and then apply the paint the right way to achieve a professional finish.
